Clik here to view.
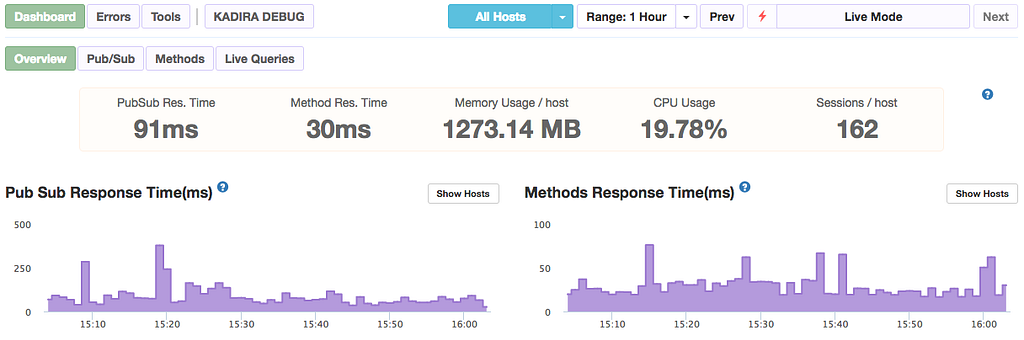
Kadira is a great performance tracking application for Meteor apps.
Unfortunately it was recently shut down, but luckily it was open sourced for anyone to self-host.
In this guide I’ll show you from A to Z how to get Kadira running on a DigitalOcean droplet. It’ll take you around an hour to get everything up and running.
Many thanks to Michael Lazarski for his original guide. I used it as the foundation to this guide and expanded upon it.
https://medium.com/@foodfitnesscode/setting-up-kadira-on-a-ubuntu-16-04-server-part-1-a821cdddd1e6
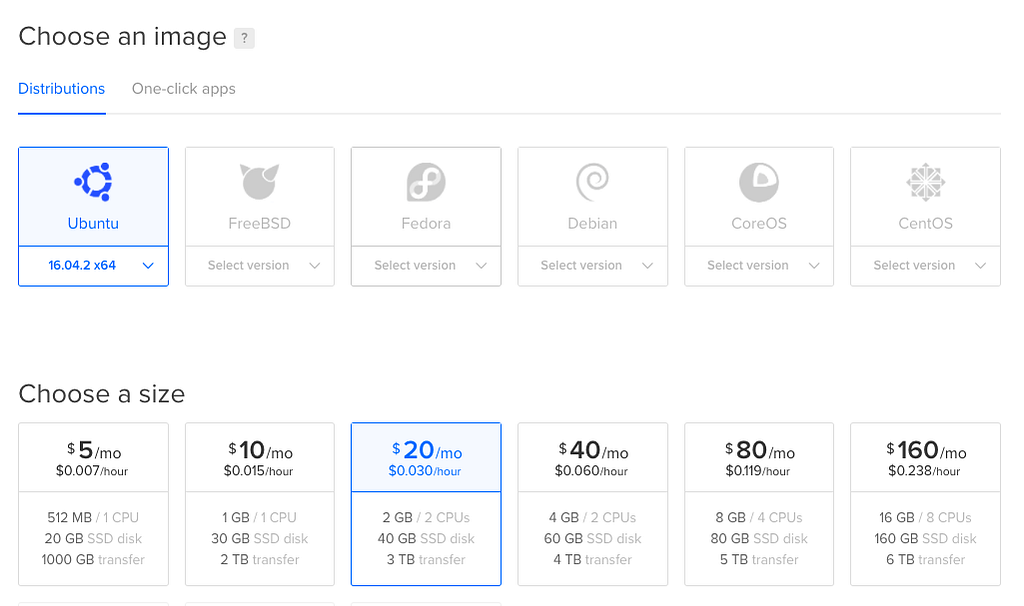
Create your DigitalOcean droplet.
Pick Ubuntu 16.04 x64 for the OS. I created the 2GB ram droplet ($20/month), you can choose whatever fits your needs.
Clik here to view.
You’ll get your credentials via email. Login to your VPS and setup your initial password when prompted.
Heads up: I’m not a devops guys, I know enough to be dangerous and get the job done but that’s the limit. We’re going to use root for everything and this guide assumes that. If you use a specific “kadira” system account, this guide may not work out for you.
Let’s update our droplet to have everything we need installed.
sudo apt-get update
sudo apt-get upgrade
sudo apt-get install ufw
sudo ufw allow OpenSSH
sudo ufw allow 543
sudo ufw allow 4000
sudo ufw allow 11011
sudo apt-get install nginx
sudo apt-get install git
sudo apt-get install nodejs
sudo apt-get install npm
sudo apt-get install python
curl https://install.meteor.com/ | sh
Installing MongoDB into our droplet.
These commands are all each one line, try to copy them over to a text editor first to format them properly.
sudo apt-key adv --keyserver hkp://keyserver.ubuntu.com:80 --recv 0C49F3730359A14518585931BC711F9BA15703C6
Create the list file for MongoDB.
echo "deb [ arch=amd64,arm64 ] http://repo.mongodb.org/apt/ubuntu xenial/mongodb-org/3.4 multiverse" | sudo tee /etc/apt/sources.list.d/mongodb-org-3.4.list
Reload your local packages.
sudo apt-get update
Install MongoDB.
sudo apt-get install -y mongodb-org
And finally run it.
sudo service mongod start
If everything was configured properly, you should be able to use the Mongo instance by using the mongo command.
root@hostname:~# mongo
MongoDB shell version v3.4.5
connecting to: mongodb://127.0.0.1:27017
MongoDB server version: 3.4.5
Kadira requires something special from Mongo in order to work. We need to configure replication sets.
sudo nano /etc/mongod.conf
Make sure you have this somewhere in that configuration file.
replication:
  replSetName: "kadira"
Finally turn on replication for your Mongo instance.
mongo admin --eval 'rs.initiate({_id: "kadira", members:[{_id : 0, host : "localhost:27017"},]})'And set it up as a slave.
mongo admin --eval 'rs.slaveOk()'
Create the necessary MongoDB collections.
Let’s create the collections Kadira needs from our Mongo instance. Each command is a single line.
mongo
use kadiraApps
db.createUser({ user: "admin", pwd: "admin", roles: [ "readWrite", "dbAdmin" ]})
use kadiraData
db.createUser({ user: "admin", pwd: "admin", roles: [ "readWrite", "dbAdmin" ]})
Optimizing MongoDB for performance.
You can add some optimizations for our Mongo instance.
sudo nano /etc/init.d/disable-transparent-hugepages
Paste this in that file:
#!/bin/bash
### BEGIN INIT INFO
# Provides:          disable-transparent-hugepages
# Required-Start:    $local_fs
# Required-Stop:
# X-Start-Before:    mongod mongodb-mms-automation-agent
# Default-Start:     2 3 4 5
# Default-Stop:      0 1 6
# Short-Description: Disable Linux transparent huge pages
# Description:       Disable Linux transparent huge pages, to improve
#                    database performance.
### END INIT INFO
case $1 in
  start)
    if [ -d /sys/kernel/mm/transparent_hugepage ]; then
      thp_path=/sys/kernel/mm/transparent_hugepage
    elif [ -d /sys/kernel/mm/redhat_transparent_hugepage ]; then
      thp_path=/sys/kernel/mm/redhat_transparent_hugepage
    else
      return 0
    fi
echo 'never' > ${thp_path}/enabled
    echo 'never' > ${thp_path}/defrag
re='^[0-1]+$'
if [[ $(cat ${thp_path}/khugepaged/defrag) =~ $re ]]
then
# RHEL 7
echo 0 > ${thp_path}/khugepaged/defrag
else
# RHEL 6
echo 'no' > ${thp_path}/khugepaged/defrag
fi
unset re
    unset thp_path
    ;;
esac
Make it executable.
sudo chmod 755 /etc/init.d/disable-transparent-hugepages
Enable it on boot.
sudo update-rc.d disable-transparent-hugepages defaults
Reboot the system.
sudo reboot now
Setting up nginx for the project.
We already have nginx installed from a previous step earlier in this guide. Now we’re going to configure it. Basically we want two things to happen:
- Port 80 routes internally to port 4000 for the kadira-ui project.
- Port 11011 is routed to the kadira-engine project.
First let’s remove the default pages.
sudo rm /etc/nginx/sites-enabled/default
Create a new block for the kadira-ui project.
sudo nano /etc/nginx/sites-available/kadira
Paste this inside.
server_tokens off; # for security-by-obscurity: stop displaying nginx version
# this section is needed to proxy web-socket connections
map $http_upgrade $connection_upgrade {
        default upgrade;
        ''      close;
}
# HTTP
server {
        listen 80 default_server;
        listen [::]:80 default_server ipv6only=on;
# pass requests to Meteor
        location / {
            proxy_pass http://127.0.0.1:4000;
            proxy_http_version 1.1;
            proxy_set_header Upgrade $http_upgrade; #for websockets
            proxy_set_header Connection $connection_upgrade;
            proxy_set_header X-Forwarded-For $remote_addr;
            proxy_set_header Host $host;
        }
}
# HTTPS server
server {
    listen 443 default_server http2; # we enable SPDY here
    server_name [::]:443 default_server; # this domain must match Common Name (CN) in the SSL certificate
root html; # irrelevant
    index index.html; # irrelevant
# config to enable HSTS(HTTP Strict Transport Security) https://developer.mozilla.org/en-US/docs/Security/HTTP_Strict_Transport_Security
    # to avoid ssl stripping https://en.wikipedia.org/wiki/SSL_stripping#SSL_stripping
    add_header Strict-Transport-Security "max-age=31536000;";
# If your application is not compatible with IE <= 10, this will redirect visitors to a page advising a browser update
    # This works because IE 11 does not present itself as MSIE anymore
    if ($http_user_agent ~ "MSIE" ) {
        return 303 https://browser-update.org/update.html;
    }
# pass all requests to Meteor
    location / {
        proxy_pass http://127.0.0.1:4000;
        proxy_http_version 1.1;
        proxy_set_header Upgrade $http_upgrade; # allow websockets
        proxy_set_header Connection $connection_upgrade;
        proxy_set_header X-Forwarded-For $remote_addr; # preserve client IP
# this setting allows the browser to cache the application in a way compatible with Meteor
        # on every applicaiton update the name of CSS and JS file is different, so they can be cache infinitely (here: 30 days)
        # the root path (/) MUST NOT be cached
        if ($uri != '/') {
            expires 30d;
        }
    }
}
Enable the new Kadira UI.
sudo ln -s /etc/nginx/sites-available/kadira /etc/nginx/sites-enabled/
Test to make sure the nginx configuration isn’t broken.
sudo nginx -t
Now we’re going to configure the kadira-engine block.
sudo nano /etc/nginx/sites-available/kadira-engine
Paste this in.
# this section is needed to proxy web-socket connections
map $http_upgrade $connection_upgrade {
        default upgrade;
        ''      close;
}
# HTTPS server
server {
    listen 543 default_server http2; # we enable SPDY here
    server_name [::]:543 default_server; # this domain must match Common Name (CN) in the SSL certificate
root html; # irrelevant
    index index.html; # irrelevant
# config to enable HSTS(HTTP Strict Transport Security) https://developer.mozilla.org/en-US/docs/Security/HTTP_Strict_Transport_Security
    # to avoid ssl stripping https://en.wikipedia.org/wiki/SSL_stripping#SSL_stripping
    add_header Strict-Transport-Security "max-age=31536000;";
# If your application is not compatible with IE <= 10, this will redirect visitors to a page advising a browser update
    # This works because IE 11 does not present itself as MSIE anymore
    if ($http_user_agent ~ "MSIE" ) {
        return 303 https://browser-update.org/update.html;
    }
# pass all requests to Meteor
    location / {
        proxy_pass http://127.0.0.1:11011;
        proxy_http_version 1.1;
        proxy_set_header Upgrade $http_upgrade; # allow websockets
        proxy_set_header Connection $connection_upgrade;
        proxy_set_header X-Forwarded-For $remote_addr; # preserve client IP
# this setting allows the browser to cache the application in a way compatible with Meteor
        # on every applicaiton update the name of CSS and JS file is different, so they can be cache infinitely (here: 30 days)
        # the root path (/) MUST NOT be cached
        if ($uri != '/') {
            expires 30d;
        }
    }
}
Enable the kadira-engine block.
sudo ln -s /etc/nginx/sites-available/kadira-engine /etc/nginx/sites-enabled/
Test the nginx configuration.
sudo nginx -t
If everything went well you can now restart nginx!
sudo systemctl restart nginx
Cloning the open source Kadira project.
We’re going to clone the open source Kadira project onto our droplet and run it.
First let’s make sure we’re cloning it to the right place.
cd ~/
git clone https://github.com/lampe/kadira-server.git
Let’s dive into the kadira-server folder and edit the init-shell.sh file.
cd kadira-server/
chmod +x init-shell.sh
sudo nano init-shell.sh
Paste this in. Note that you’ll need to have your AWS credentials, and your droplet’s IP address for this file. Have those handy.
# DB settings export APP_MONGO_URL="mongodb://admin:admin@localhost:27017/kadiraApps"
export APP_MONGO_OPLOG_URL="mongodb://localhost:27017/local"
export DATA_MONGO_URL="mongodb://admin:admin@localhost:27017/kadiraData"
export MAIL_URL="smtp://postmaster%40kadira.io:9jx4fqhdfbg5@smtp.mailgun.org:587"
# Engine settings
export ENGINE_PORT=11011
export EXPORT_OPTIONS_URL="http://[YOUR DROPLET IP]:11011"
# UI settings
export UI_PORT=4000
export UI_URL="http://localhost:$UI_PORT"
# CPU Profiler needs a s3 bucket
export AWS_DEFAULT_REGION="eu-central-1"
export AWS_ACCESS_KEY_ID="[YOUR AWS ACCESS KEY]"
export AWS_SECRET_ACCESS_KEY="[YOUR AWS SECRET ACCESS KEY]"
# Monitoring Setup
export LIBRATO_EMAIL
export LIBRATO_TOKEN
At this point we’re just about finished. Now we need to go through each microservice Kadira has and set it up as a managed service and we’re all set.
Let’s wrap this up!
Kadira Engine
cd ~/kadira-server/kadira-engine
npm install
source ../init-shell.sh
chmod +x run.sh
Run it manually to see if everything is work as expected.
./run.sh
Create a service for kadira-engine.
sudo nano /etc/systemd/system/kadira-engine.service
Paste this in.
[Unit]
Description=kadira-engine
[Service]
Type=simple
User=root
WorkingDirectory=/root/kadira-server
ExecStart=/bin/bash -c "source /root/kadira-server/init-shell.sh; cd /root/kadira-server/kadira-engine; ./run.sh"
Restart=on-abort
[Install]
WantedBy=multi-user.target
Start the service.
systemctl start kadira-engine.service
Check it’s status.
systemctl status kadira-engine.service
Finally enable it.
systemctl enable kadira-engine.service
Kadira RMA
We need to create a new records in our Mongo instance for Kadira RMA to work properly.
mongo
use kadiraData
db.mapReduceProfileConfig.insert({lastTime: new Date(), _id:{profile:'1min',provider:'methods',shard:"one"}})
db.mapReduceProfileConfig.insert({lastTime: new Date(), _id:{profile:'1min',provider:'errors',shard:"one"}})
db.mapReduceProfileConfig.insert({lastTime: new Date(), _id:{profile:'1min',provider:'pubsub',shard:"one"}})
db.mapReduceProfileConfig.insert({lastTime: new Date(), _id:{profile:'1min',provider:'system',shard:"one"}})
db.mapReduceProfileConfig.insert({lastTime: new Date(), _id:{profile:'3hour',provider:'methods',shard:"one"}})
db.mapReduceProfileConfig.insert({lastTime: new Date(), _id:{profile:'3hour',provider:'errors',shard:"one"}})
db.mapReduceProfileConfig.insert({lastTime: new Date(), _id:{profile:'3hour',provider:'pubsub',shard:"one"}})
db.mapReduceProfileConfig.insert({lastTime: new Date(), _id:{profile:'3hour',provider:'system',shard:"one"}})db.mapReduceProfileConfig.insert({lastTime: new Date(), _id:{profile:'30min',provider:'methods',shard:"one"}})
db.mapReduceProfileConfig.insert({lastTime: new Date(), _id:{profile:'30min',provider:'errors',shard:"one"}})
db.mapReduceProfileConfig.insert({lastTime: new Date(), _id:{profile:'30min',provider:'pubsub',shard:"one"}})
db.mapReduceProfileConfig.insert({lastTime: new Date(), _id:{profile:'30min',provider:'system',shard:"one"}})Now let’s setup the project.
cd ~/kadira-server/kadira-rma
npm install
source ../init-shell.sh
chmod +x run.sh
Run it manually to see if everything is work as expected.
./run.sh
Create a service for kadira-rma.
sudo nano /etc/systemd/system/kadira-rma.service
Paste this in.
[Unit]
Description=kadira-rma
[Service]
Type=simple
User=root
WorkingDirectory=/root/kadira-server
ExecStart=/bin/bash -c "source /root/kadira-server/init-shell.sh; cd /root/kadira-server/kadira-rma; ./run.sh"
Restart=on-abort
[Install]
WantedBy=multi-user.target
Start the service.
systemctl start kadira-rma.service
Check it’s status.
systemctl status kadira-rma.service
Finally enable it.
systemctl enable kadira-rma.service
Kadira UI
We need to configure a few extra files for this project.
Start by editing the settings.json file.
cd ~/kadira-server/kadira-ui
sudo nano settings.json
Then make sure the file contents look like this:
{
  "public": {
    "tender": {
      "key": "405871e6-4816-4d44-a0f3-860c0e988078"
    },
    "s3Url": "https://[YOUR BUCKET NAME HERE].s3.[YOUR BUCKET REGION HERE].amazonaws.com/",
    "intercom": {},
    "loginState": {
      "domain": "",
      "cookieName": "kadira-dev-login-state"
    }
  },
"tender": {
"secret": "71825e70-d11d-489b-b273-2afdca024fd6"
},"stripe": {
"kadirahq": {
"apiKey": "sk_test_22QITCBPhqEaEKjHXK5BBwO8",
"publishableKey": "pk_test_Tc1iVNRP9p8o7zgYWoWjZnm4",
"appName": "KadiraHQ",
"appLogo": "https://kadira.io/favicon.ico"
}
},"meteorDevelopers": {
"clientId": "HcempmSyaawiyb4G4",
"secret": "snC3snsmTebC8HHCwwhqhHaAzAFxtFsQRL"
}
}Then edit run.sh to allow for superuser functionality since we’re running everything using the root user.
#!/bin/bash
MONGO_URL=$APP_MONGO_URL \
MONGO_OPLOG_URL=$APP_MONGO_OPLOG_URL \
MONGO_SHARD_URL_one=$DATA_MONGO_URL \
MAIL_URL=$MAIL_URL \
ROOT_URL=$UI_ROOT_URL \
meteor --allow-superuser  --port $UI_PORT --settings ./settings.json $@
Let’s install the dependencies now.
npm install
source ../init-shell.sh
chmod +x run.sh
Run it manually to see if everything is work as expected.
./run.sh
Create a service for kadira-ui.
sudo nano /etc/systemd/system/kadira-ui.service
Paste this in.
[Unit]
Description=kadira-ui
[Service]
Type=simple
User=root
WorkingDirectory=/root/kadira-server
ExecStart=/bin/bash -c "source /root/kadira-server/init-shell.sh; cd /root/kadira-server/kadira-ui; ./run.sh"
Restart=on-abort
[Install]
WantedBy=multi-user.target
Start the service.
systemctl start kadira-ui.service
Check it’s status.
systemctl status kadira-ui.service
Finally enable it.
systemctl enable kadira-ui.service
Kadira API
cd ~/kadira-server/kadira-api
npm install
Create a service for kadira-api.
sudo nano /etc/systemd/system/kadira-api.service
Paste this in.
[Unit]
Description=kadira-api
[Service]
Type=simple
User=root
WorkingDirectory=/root/kadira-server
ExecStart=/bin/bash -c "source /root/kadira-server/init-shell.sh; cd /root/kadira-server/kadira-api; ./run.sh"
Restart=on-abort
[Install]
WantedBy=multi-user.target
Start the service.
systemctl start kadira-api.service
Check it’s status.
systemctl status kadira-api.service
Finally enable it.
systemctl enable kadira-api.service
Kadira Alertsman
cd ~/kadira-server/kadira-alertsman
npm install
Create a service for kadira-api.
sudo nano /etc/systemd/system/kadira-alertsman.service
Paste this in.
Unit]
Description=kadira-alertsman
[Service]
Type=simple
User=root
WorkingDirectory=/root/kadira-server
ExecStart=/bin/bash -c "source /root/kadira-server/init-shell.sh; cd /root/kadira-server/kadira-alertsman; ./run.sh"
Restart=on-abort
[Install]
WantedBy=multi-user.target
Start the service.
systemctl start kadira-alertsman.service
Check it’s status.
systemctl status kadira-alertsman.service
Finally enable it.
systemctl enable kadira-alertsman.service
We’re done with project setup!
Now you need to create an account so you can use the Kadira app in the browser. The easiest way is to add the code to automatically create an account.
sudo nano ~/kadira-server/kadira-ui/server/methods/account.js
Paste this in somewhere in the file.
Meteor.startup(() =>{
  Accounts.createUser({
    username: 'someusername',
    email: 'test@email.com',
    password: "somepassword"
  })
})
Reload the page a few times: http://your-ip-address:4000
Then go back to edit the same file and remove that code you just added. It’s no longer needed.
Try logging into your account now you should be able to sign in and create a project to get your Kadira keys.
Hooking up your Meteor project to your personal Kadira instance.
This is it! You made it this far, get ready for some sweet performance analytics!
In your settings.json file, make sure you have a Kadira option.
"kadira": {
    "appId": "[your-app-id]",
    "appSecret": "[your-app-secret]",
    "options": {
      "endpoint": "http://[your-ip-address]:11011"
    }
  }
Run your Meteor project using the settings flag.
meteor run --settings settings.json
And you’re done!
I hope you enjoyed this guide and it helped you save some time. Leave a ❤️ if you liked it, thanks!
Image may be NSFW.Clik here to view.
How to setup your own Kadira instance on a VPS like DigitalOcean. was originally published in sergiotapia on Medium, where people are continuing the conversation by highlighting and responding to this story.