Here’s a neat little tip. With Elixir 1.4, you no longer need to add the same dependency to your dep list and applications list.
↧
Application inference in Elixir 1.4
↧
Different layouts with React Router.

Here’s a great tip if you’ve ever wanted to handle different layouts for different sections of your website built with React Router.
↧
↧
Alias your Phoenix mix commands for some nice developer UX.
Are you using Elixir? Add it to your stack on StackShare and find companies using Elixir in production.
↧
How to manage beta features for your users with email campaigns.
You have a new amazing feature for your product and you only want a few users to have access to it.
↧
Pluralizing strings in Javascript ES6.
Have you ever wondered: How can I pluralize words in Javascript?
Wonder no more!
You can use the pluralize library for this.
NPM:
npm install pluralize --save
Yarn:
yarn add pluralize
Wherever you want to use the lib, you can require it easily.
var pluralize = require('pluralize')I like to add it to the window object so I can just invoke pluralize() wherever I need it. Within my application.js root file:
window.pluralize = require('pluralize')Then you can just use it anywhere.
<span className="pull-left">
  {`${item.score} ${pluralize('point', item.score)}`}
</span>
You can find the pluralize library here:
Pluralizing strings in Javascript ES6. was originally published in sergiotapia on Medium, where people are continuing the conversation by highlighting and responding to this story.
↧
↧
Implementing ActiveRecords’ errors full_messages for Elixir/Phoenix and Ecto
In Rails you can easily get an array of full error messages from a model.
full_messages (ActiveModel::Errors) - APIdock
class Person
  validates_presence_of :name, :address, :email
  validates_length_of :name, in: 5..30
end
person = Person.create(address: '123 First St.')
person.errors.full_messages
# => ["Name is too short (minimum is 5 characters)", "Name can't be blank", "Email can't be blank"]
Here’s how I did it for my Phoenix project with Ecto.
def save_torrent(torrent) do
  changeset = Torrent.changeset(%Torrent{}, torrent)
  case Repo.insert(changeset) do
    {:ok, _torrent} ->
      Logger.info "Torrent saved to database: #{torrent.name}"
    {:error, changeset} ->
      errors = Enum.reduce(changeset.errors, [], fn (field_error, errors) ->
        {field, {error_message, _}} = field_error
        errors = ["#{field} #{error_message}" | errors]
      end)
      Logger.error "Torrent skipped: #{torrent.name} - Errors: #{Enum.join(errors, ", ")}"
  end
end
We iterate through a changeset’s errors map and reduce each one into a errors accumulator.
Here’s the relevant code:
errors = Enum.reduce(changeset.errors, [], fn (field_error, errors) ->
  {field, {error_message, _}} = field_error
  errors = ["#{field} #{error_message}" | errors]
end)
Update: Jose suggested a cleaner option! Check it out.
errors = for {key, {message, _}} <- changeset.errors do
  "#{key} #{message}"
end
errors ends up being a list of strings, which we can just Enum.join() to turn it into a nice comma separated string.
[error] Torrent skipped: Big Bunny - Errors: magnet has already been taken
Hopefully we can build this method directly into Ecto so in the future we can just call:
changeset.full_errors
Please leave your feedback on the feature proposal:
New feature proposal: changeset errors full message.
Implementing ActiveRecords’ errors full_messages for Elixir/Phoenix and Ecto was originally published in sergiotapia on Medium, where people are continuing the conversation by highlighting and responding to this story.
↧
How to setup your own Kadira instance on a VPS like DigitalOcean.
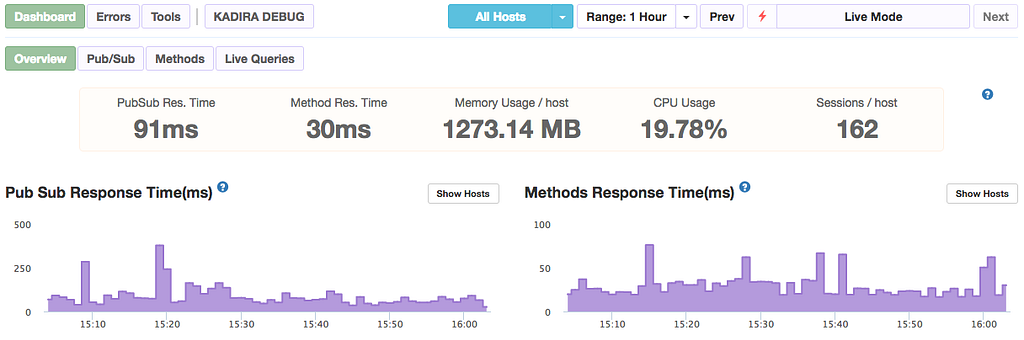
Kadira is a great performance tracking application for Meteor apps.
Unfortunately it was recently shut down, but luckily it was open sourced for anyone to self-host.
In this guide I’ll show you from A to Z how to get Kadira running on a DigitalOcean droplet. It’ll take you around an hour to get everything up and running.
Many thanks to Michael Lazarski for his original guide. I used it as the foundation to this guide and expanded upon it.
https://medium.com/@foodfitnesscode/setting-up-kadira-on-a-ubuntu-16-04-server-part-1-a821cdddd1e6
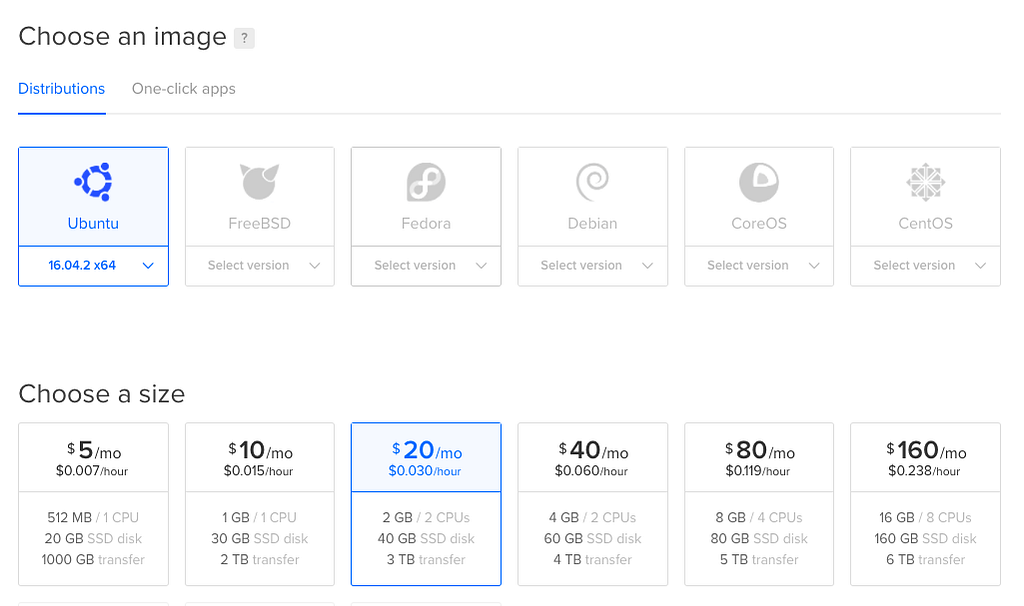
Create your DigitalOcean droplet.
Pick Ubuntu 16.04 x64 for the OS. I created the 2GB ram droplet ($20/month), you can choose whatever fits your needs.
You’ll get your credentials via email. Login to your VPS and setup your initial password when prompted.
Heads up: I’m not a devops guys, I know enough to be dangerous and get the job done but that’s the limit. We’re going to use root for everything and this guide assumes that. If you use a specific “kadira” system account, this guide may not work out for you.
Let’s update our droplet to have everything we need installed.
sudo apt-get update
sudo apt-get upgrade
sudo apt-get install ufw
sudo ufw allow OpenSSH
sudo ufw allow 543
sudo ufw allow 4000
sudo ufw allow 11011
sudo apt-get install nginx
sudo apt-get install git
sudo apt-get install nodejs
sudo apt-get install npm
sudo apt-get install python
curl https://install.meteor.com/ | sh
Installing MongoDB into our droplet.
These commands are all each one line, try to copy them over to a text editor first to format them properly.
sudo apt-key adv --keyserver hkp://keyserver.ubuntu.com:80 --recv 0C49F3730359A14518585931BC711F9BA15703C6
Create the list file for MongoDB.
echo "deb [ arch=amd64,arm64 ] http://repo.mongodb.org/apt/ubuntu xenial/mongodb-org/3.4 multiverse" | sudo tee /etc/apt/sources.list.d/mongodb-org-3.4.list
Reload your local packages.
sudo apt-get update
Install MongoDB.
sudo apt-get install -y mongodb-org
And finally run it.
sudo service mongod start
If everything was configured properly, you should be able to use the Mongo instance by using the mongo command.
root@hostname:~# mongo
MongoDB shell version v3.4.5
connecting to: mongodb://127.0.0.1:27017
MongoDB server version: 3.4.5
Kadira requires something special from Mongo in order to work. We need to configure replication sets.
sudo nano /etc/mongod.conf
Make sure you have this somewhere in that configuration file.
replication:
  replSetName: "kadira"
Finally turn on replication for your Mongo instance.
mongo admin --eval 'rs.initiate({_id: "kadira", members:[{_id : 0, host : "localhost:27017"},]})'And set it up as a slave.
mongo admin --eval 'rs.slaveOk()'
Create the necessary MongoDB collections.
Let’s create the collections Kadira needs from our Mongo instance. Each command is a single line.
mongo
use kadiraApps
db.createUser({ user: "admin", pwd: "admin", roles: [ "readWrite", "dbAdmin" ]})
use kadiraData
db.createUser({ user: "admin", pwd: "admin", roles: [ "readWrite", "dbAdmin" ]})
Optimizing MongoDB for performance.
You can add some optimizations for our Mongo instance.
sudo nano /etc/init.d/disable-transparent-hugepages
Paste this in that file:
#!/bin/bash
### BEGIN INIT INFO
# Provides:          disable-transparent-hugepages
# Required-Start:    $local_fs
# Required-Stop:
# X-Start-Before:    mongod mongodb-mms-automation-agent
# Default-Start:     2 3 4 5
# Default-Stop:      0 1 6
# Short-Description: Disable Linux transparent huge pages
# Description:       Disable Linux transparent huge pages, to improve
#                    database performance.
### END INIT INFO
case $1 in
  start)
    if [ -d /sys/kernel/mm/transparent_hugepage ]; then
      thp_path=/sys/kernel/mm/transparent_hugepage
    elif [ -d /sys/kernel/mm/redhat_transparent_hugepage ]; then
      thp_path=/sys/kernel/mm/redhat_transparent_hugepage
    else
      return 0
    fi
echo 'never' > ${thp_path}/enabled
    echo 'never' > ${thp_path}/defrag
re='^[0-1]+$'
if [[ $(cat ${thp_path}/khugepaged/defrag) =~ $re ]]
then
# RHEL 7
echo 0 > ${thp_path}/khugepaged/defrag
else
# RHEL 6
echo 'no' > ${thp_path}/khugepaged/defrag
fi
unset re
    unset thp_path
    ;;
esac
Make it executable.
sudo chmod 755 /etc/init.d/disable-transparent-hugepages
Enable it on boot.
sudo update-rc.d disable-transparent-hugepages defaults
Reboot the system.
sudo reboot now
Setting up nginx for the project.
We already have nginx installed from a previous step earlier in this guide. Now we’re going to configure it. Basically we want two things to happen:
- Port 80 routes internally to port 4000 for the kadira-ui project.
- Port 11011 is routed to the kadira-engine project.
First let’s remove the default pages.
sudo rm /etc/nginx/sites-enabled/default
Create a new block for the kadira-ui project.
sudo nano /etc/nginx/sites-available/kadira
Paste this inside.
server_tokens off; # for security-by-obscurity: stop displaying nginx version
# this section is needed to proxy web-socket connections
map $http_upgrade $connection_upgrade {
        default upgrade;
        ''      close;
}
# HTTP
server {
        listen 80 default_server;
        listen [::]:80 default_server ipv6only=on;
# pass requests to Meteor
        location / {
            proxy_pass http://127.0.0.1:4000;
            proxy_http_version 1.1;
            proxy_set_header Upgrade $http_upgrade; #for websockets
            proxy_set_header Connection $connection_upgrade;
            proxy_set_header X-Forwarded-For $remote_addr;
            proxy_set_header Host $host;
        }
}
# HTTPS server
server {
    listen 443 default_server http2; # we enable SPDY here
    server_name [::]:443 default_server; # this domain must match Common Name (CN) in the SSL certificate
root html; # irrelevant
    index index.html; # irrelevant
# config to enable HSTS(HTTP Strict Transport Security) https://developer.mozilla.org/en-US/docs/Security/HTTP_Strict_Transport_Security
    # to avoid ssl stripping https://en.wikipedia.org/wiki/SSL_stripping#SSL_stripping
    add_header Strict-Transport-Security "max-age=31536000;";
# If your application is not compatible with IE <= 10, this will redirect visitors to a page advising a browser update
    # This works because IE 11 does not present itself as MSIE anymore
    if ($http_user_agent ~ "MSIE" ) {
        return 303 https://browser-update.org/update.html;
    }
# pass all requests to Meteor
    location / {
        proxy_pass http://127.0.0.1:4000;
        proxy_http_version 1.1;
        proxy_set_header Upgrade $http_upgrade; # allow websockets
        proxy_set_header Connection $connection_upgrade;
        proxy_set_header X-Forwarded-For $remote_addr; # preserve client IP
# this setting allows the browser to cache the application in a way compatible with Meteor
        # on every applicaiton update the name of CSS and JS file is different, so they can be cache infinitely (here: 30 days)
        # the root path (/) MUST NOT be cached
        if ($uri != '/') {
            expires 30d;
        }
    }
}
Enable the new Kadira UI.
sudo ln -s /etc/nginx/sites-available/kadira /etc/nginx/sites-enabled/
Test to make sure the nginx configuration isn’t broken.
sudo nginx -t
Now we’re going to configure the kadira-engine block.
sudo nano /etc/nginx/sites-available/kadira-engine
Paste this in.
# this section is needed to proxy web-socket connections
map $http_upgrade $connection_upgrade {
        default upgrade;
        ''      close;
}
# HTTPS server
server {
    listen 543 default_server http2; # we enable SPDY here
    server_name [::]:543 default_server; # this domain must match Common Name (CN) in the SSL certificate
root html; # irrelevant
    index index.html; # irrelevant
# config to enable HSTS(HTTP Strict Transport Security) https://developer.mozilla.org/en-US/docs/Security/HTTP_Strict_Transport_Security
    # to avoid ssl stripping https://en.wikipedia.org/wiki/SSL_stripping#SSL_stripping
    add_header Strict-Transport-Security "max-age=31536000;";
# If your application is not compatible with IE <= 10, this will redirect visitors to a page advising a browser update
    # This works because IE 11 does not present itself as MSIE anymore
    if ($http_user_agent ~ "MSIE" ) {
        return 303 https://browser-update.org/update.html;
    }
# pass all requests to Meteor
    location / {
        proxy_pass http://127.0.0.1:11011;
        proxy_http_version 1.1;
        proxy_set_header Upgrade $http_upgrade; # allow websockets
        proxy_set_header Connection $connection_upgrade;
        proxy_set_header X-Forwarded-For $remote_addr; # preserve client IP
# this setting allows the browser to cache the application in a way compatible with Meteor
        # on every applicaiton update the name of CSS and JS file is different, so they can be cache infinitely (here: 30 days)
        # the root path (/) MUST NOT be cached
        if ($uri != '/') {
            expires 30d;
        }
    }
}
Enable the kadira-engine block.
sudo ln -s /etc/nginx/sites-available/kadira-engine /etc/nginx/sites-enabled/
Test the nginx configuration.
sudo nginx -t
If everything went well you can now restart nginx!
sudo systemctl restart nginx
Cloning the open source Kadira project.
We’re going to clone the open source Kadira project onto our droplet and run it.
First let’s make sure we’re cloning it to the right place.
cd ~/
git clone https://github.com/lampe/kadira-server.git
Let’s dive into the kadira-server folder and edit the init-shell.sh file.
cd kadira-server/
chmod +x init-shell.sh
sudo nano init-shell.sh
Paste this in. Note that you’ll need to have your AWS credentials, and your droplet’s IP address for this file. Have those handy.
# DB settings export APP_MONGO_URL="mongodb://admin:admin@localhost:27017/kadiraApps"
export APP_MONGO_OPLOG_URL="mongodb://localhost:27017/local"
export DATA_MONGO_URL="mongodb://admin:admin@localhost:27017/kadiraData"
export MAIL_URL="smtp://postmaster%40kadira.io:9jx4fqhdfbg5@smtp.mailgun.org:587"
# Engine settings
export ENGINE_PORT=11011
export EXPORT_OPTIONS_URL="http://[YOUR DROPLET IP]:11011"
# UI settings
export UI_PORT=4000
export UI_URL="http://localhost:$UI_PORT"
# CPU Profiler needs a s3 bucket
export AWS_DEFAULT_REGION="eu-central-1"
export AWS_ACCESS_KEY_ID="[YOUR AWS ACCESS KEY]"
export AWS_SECRET_ACCESS_KEY="[YOUR AWS SECRET ACCESS KEY]"
# Monitoring Setup
export LIBRATO_EMAIL
export LIBRATO_TOKEN
At this point we’re just about finished. Now we need to go through each microservice Kadira has and set it up as a managed service and we’re all set.
Let’s wrap this up!
Kadira Engine
cd ~/kadira-server/kadira-engine
npm install
source ../init-shell.sh
chmod +x run.sh
Run it manually to see if everything is work as expected.
./run.sh
Create a service for kadira-engine.
sudo nano /etc/systemd/system/kadira-engine.service
Paste this in.
[Unit]
Description=kadira-engine
[Service]
Type=simple
User=root
WorkingDirectory=/root/kadira-server
ExecStart=/bin/bash -c "source /root/kadira-server/init-shell.sh; cd /root/kadira-server/kadira-engine; ./run.sh"
Restart=on-abort
[Install]
WantedBy=multi-user.target
Start the service.
systemctl start kadira-engine.service
Check it’s status.
systemctl status kadira-engine.service
Finally enable it.
systemctl enable kadira-engine.service
Kadira RMA
We need to create a new records in our Mongo instance for Kadira RMA to work properly.
mongo
use kadiraData
db.mapReduceProfileConfig.insert({lastTime: new Date(), _id:{profile:'1min',provider:'methods',shard:"one"}})
db.mapReduceProfileConfig.insert({lastTime: new Date(), _id:{profile:'1min',provider:'errors',shard:"one"}})
db.mapReduceProfileConfig.insert({lastTime: new Date(), _id:{profile:'1min',provider:'pubsub',shard:"one"}})
db.mapReduceProfileConfig.insert({lastTime: new Date(), _id:{profile:'1min',provider:'system',shard:"one"}})
db.mapReduceProfileConfig.insert({lastTime: new Date(), _id:{profile:'3hour',provider:'methods',shard:"one"}})
db.mapReduceProfileConfig.insert({lastTime: new Date(), _id:{profile:'3hour',provider:'errors',shard:"one"}})
db.mapReduceProfileConfig.insert({lastTime: new Date(), _id:{profile:'3hour',provider:'pubsub',shard:"one"}})
db.mapReduceProfileConfig.insert({lastTime: new Date(), _id:{profile:'3hour',provider:'system',shard:"one"}})db.mapReduceProfileConfig.insert({lastTime: new Date(), _id:{profile:'30min',provider:'methods',shard:"one"}})
db.mapReduceProfileConfig.insert({lastTime: new Date(), _id:{profile:'30min',provider:'errors',shard:"one"}})
db.mapReduceProfileConfig.insert({lastTime: new Date(), _id:{profile:'30min',provider:'pubsub',shard:"one"}})
db.mapReduceProfileConfig.insert({lastTime: new Date(), _id:{profile:'30min',provider:'system',shard:"one"}})Now let’s setup the project.
cd ~/kadira-server/kadira-rma
npm install
source ../init-shell.sh
chmod +x run.sh
Run it manually to see if everything is work as expected.
./run.sh
Create a service for kadira-rma.
sudo nano /etc/systemd/system/kadira-rma.service
Paste this in.
[Unit]
Description=kadira-rma
[Service]
Type=simple
User=root
WorkingDirectory=/root/kadira-server
ExecStart=/bin/bash -c "source /root/kadira-server/init-shell.sh; cd /root/kadira-server/kadira-rma; ./run.sh"
Restart=on-abort
[Install]
WantedBy=multi-user.target
Start the service.
systemctl start kadira-rma.service
Check it’s status.
systemctl status kadira-rma.service
Finally enable it.
systemctl enable kadira-rma.service
Kadira UI
We need to configure a few extra files for this project.
Start by editing the settings.json file.
cd ~/kadira-server/kadira-ui
sudo nano settings.json
Then make sure the file contents look like this:
{
  "public": {
    "tender": {
      "key": "405871e6-4816-4d44-a0f3-860c0e988078"
    },
    "s3Url": "https://[YOUR BUCKET NAME HERE].s3.[YOUR BUCKET REGION HERE].amazonaws.com/",
    "intercom": {},
    "loginState": {
      "domain": "",
      "cookieName": "kadira-dev-login-state"
    }
  },
"tender": {
"secret": "71825e70-d11d-489b-b273-2afdca024fd6"
},"stripe": {
"kadirahq": {
"apiKey": "sk_test_22QITCBPhqEaEKjHXK5BBwO8",
"publishableKey": "pk_test_Tc1iVNRP9p8o7zgYWoWjZnm4",
"appName": "KadiraHQ",
"appLogo": "https://kadira.io/favicon.ico"
}
},"meteorDevelopers": {
"clientId": "HcempmSyaawiyb4G4",
"secret": "snC3snsmTebC8HHCwwhqhHaAzAFxtFsQRL"
}
}Then edit run.sh to allow for superuser functionality since we’re running everything using the root user.
#!/bin/bash
MONGO_URL=$APP_MONGO_URL \
MONGO_OPLOG_URL=$APP_MONGO_OPLOG_URL \
MONGO_SHARD_URL_one=$DATA_MONGO_URL \
MAIL_URL=$MAIL_URL \
ROOT_URL=$UI_ROOT_URL \
meteor --allow-superuser  --port $UI_PORT --settings ./settings.json $@
Let’s install the dependencies now.
npm install
source ../init-shell.sh
chmod +x run.sh
Run it manually to see if everything is work as expected.
./run.sh
Create a service for kadira-ui.
sudo nano /etc/systemd/system/kadira-ui.service
Paste this in.
[Unit]
Description=kadira-ui
[Service]
Type=simple
User=root
WorkingDirectory=/root/kadira-server
ExecStart=/bin/bash -c "source /root/kadira-server/init-shell.sh; cd /root/kadira-server/kadira-ui; ./run.sh"
Restart=on-abort
[Install]
WantedBy=multi-user.target
Start the service.
systemctl start kadira-ui.service
Check it’s status.
systemctl status kadira-ui.service
Finally enable it.
systemctl enable kadira-ui.service
Kadira API
cd ~/kadira-server/kadira-api
npm install
Create a service for kadira-api.
sudo nano /etc/systemd/system/kadira-api.service
Paste this in.
[Unit]
Description=kadira-api
[Service]
Type=simple
User=root
WorkingDirectory=/root/kadira-server
ExecStart=/bin/bash -c "source /root/kadira-server/init-shell.sh; cd /root/kadira-server/kadira-api; ./run.sh"
Restart=on-abort
[Install]
WantedBy=multi-user.target
Start the service.
systemctl start kadira-api.service
Check it’s status.
systemctl status kadira-api.service
Finally enable it.
systemctl enable kadira-api.service
Kadira Alertsman
cd ~/kadira-server/kadira-alertsman
npm install
Create a service for kadira-api.
sudo nano /etc/systemd/system/kadira-alertsman.service
Paste this in.
Unit]
Description=kadira-alertsman
[Service]
Type=simple
User=root
WorkingDirectory=/root/kadira-server
ExecStart=/bin/bash -c "source /root/kadira-server/init-shell.sh; cd /root/kadira-server/kadira-alertsman; ./run.sh"
Restart=on-abort
[Install]
WantedBy=multi-user.target
Start the service.
systemctl start kadira-alertsman.service
Check it’s status.
systemctl status kadira-alertsman.service
Finally enable it.
systemctl enable kadira-alertsman.service
We’re done with project setup!
Now you need to create an account so you can use the Kadira app in the browser. The easiest way is to add the code to automatically create an account.
sudo nano ~/kadira-server/kadira-ui/server/methods/account.js
Paste this in somewhere in the file.
Meteor.startup(() =>{
  Accounts.createUser({
    username: 'someusername',
    email: 'test@email.com',
    password: "somepassword"
  })
})
Reload the page a few times: http://your-ip-address:4000
Then go back to edit the same file and remove that code you just added. It’s no longer needed.
Try logging into your account now you should be able to sign in and create a project to get your Kadira keys.
Hooking up your Meteor project to your personal Kadira instance.
This is it! You made it this far, get ready for some sweet performance analytics!
In your settings.json file, make sure you have a Kadira option.
"kadira": {
    "appId": "[your-app-id]",
    "appSecret": "[your-app-secret]",
    "options": {
      "endpoint": "http://[your-ip-address]:11011"
    }
  }
Run your Meteor project using the settings flag.
meteor run --settings settings.json
And you’re done!
I hope you enjoyed this guide and it helped you save some time. Leave a ❤️ if you liked it, thanks!
How to setup your own Kadira instance on a VPS like DigitalOcean. was originally published in sergiotapia on Medium, where people are continuing the conversation by highlighting and responding to this story.
↧
How to send emails from Phoenix using Elixir and Mandrill.
Sending out emails using Mandrill is great for both sides of your team. Your designers/marketing team can build out an email using Mailchimp’s great UI designer. You can send out emails by just replacing merge_vars.
It’s a win-win!
Here’s how you can send out emails from your Phoenix Elixir application.
First let’s install the bamboo package from thoughtbot. Add the package and whichever version is latest to your mix.exs file.
{:bamboo, "~> 0.8"}Install it.
mix deps.get
Now we need to create a .env file so you can safely set your Mandrill API key without saving it to your git repository.
Inside of your .env file, paste this in:
export MANDRILL_API_KEY=mykeygoeshere
Make sure you source the .env file in your terminal window so when you run mix phx.server your project picks up the env var properly.
source .env
Finally, let’s configure bamboo to use this environment variable API key.
config :my_app, MyApp.Mailer,
  adapter: Bamboo.MandrillAdapter,
  api_key: System.get_env("MANDRILL_API_KEY")
Create a base mailer.
This mailer module is going to be in charge of actually sending out the emails, but it’s very small. Create a file called mailer.ex somewhere in your /lib folder.
defmodule MyApp.Mailer do
  use Bamboo.Mailer, otp_app: :my_app
end
And you’re done. Let’s try sending out an email now.
Sending out an email.
Sending an email is very easy, succinct and testable. We’ll create a simple email that sends out a confirmation code given a user. Module can be anything, but in this example I’m using Phoenix 1.3 and contexts to organize my code.
defmodule MyApp.User.Onboarding.Email do
  import Bamboo.Email
  import Bamboo.MandrillHelper

  def confirmation_code_email(user) do
    new_email()
    |> template("My Mandrill Template Name")
    |> to(user.email)
    |> from("hello@myapp.com")
    |> subject("Here's your confirmation code")
    |> put_param("global_merge_vars", [
      %{
        "name": "confirmationCode",
        "content": user.confirmation_code
      }
    ])
    |> MyApp.Mailer.deliver_later
  end
end
Notice how we’re using the previously created MyApp.Mailer module at the end there.
That’s all there is to it, you’re sending emails now!
Unit Testing Phoenix Framework emails
How do we test these emails though? It’s really simple and Bamboo comes with testing support out of the box.
First let’s setup the MyApp.Mailer module to use a different adapter when in test mode. Inside test.exs, let’s do this:
config :my_app, MyApp.Mailer,
  adapter: Bamboo.TestAdapter
And our test:
defmodule MyApp.User.Onboarding.EmailTest do
  use ExUnit.Case, async: true
  use Bamboo.Test
  import MyApp.Factory

  describe "Example email test" do
    test "sends an email confirmation code" do
      user = insert(:user, %{email: "abc@email.com", confirmation_code: "123123"})
      email = MyApp.User.Onboarding.Email.confirmation_code_email(user)
      assert_delivered_email(email)
    end
  end
end
The assert_delivered_email function is part of the Bamboo.Test module, that’s why we’re bringing it into our test up top.
I hope this helps you out in sending emails from a Phoenix Framework application. The Bamboo package is really top-tier and made handling emails really nice. Be sure to leave them a star on the repo:
Thanks!
How to send emails from Phoenix using Elixir and Mandrill. was originally published in sergiotapia on Medium, where people are continuing the conversation by highlighting and responding to this story.
↧
How to version your Phoenix Framework API.
Versioning your API is very important as it allows you to scope implementations to a specific number in case you want to change the way things are done later down the line.
This is a short article that will show you how to version the API in your Phoenix Framework application.
In your router.ex file, scope the API to a specific version.
scope "/api/v1", MyApp.Web.Api.V1, as: :api_v1 do
  pipe_through :api
  get "/articles/:id/content", ArticleController, :content
end
Next, place your controller in this sort of structure for convenience.

Your controller needs to be namespaced properly as well.
defmodule MyApp.Web.Api.V1.ArticleController do
  use MyApp.Web, :controller
  def content(conn, params) do
    text conn, "It's working"
  end
end
That’s all there is to it! You now have a nicely versioned API.
How to version your Phoenix Framework API. was originally published in sergiotapia on Medium, where people are continuing the conversation by highlighting and responding to this story.
↧
↧
Phoenix Framework — Direct Uploading to Amazon S3.

Today I want to teach you guys how to upload files to Amazon S3 for your Phoenix application.
We’ll set up uploads to go like this:
- User tells the backend, “I want to upload picture.jpeg!”
- Backend tells the user, “Alright you have my permission but ONLY for that filename with that extension. Here’s a token, enjoy.”
- User uses that signed token and pushes the file to our S3 bucket.
The benefit of using this approach is that your user sees a snappier upload. The file doesn’t need to be passed through our backend. Your resources don’t get bogged down when a lot of people want to upload things. It’s a win-win.
Route, controller, and json view.
Let’s create a route people can hit to receive a signed token.
post "/upload-signature", UploadSignatureController, :create
Users will need to pass in two params:
- filename
- mimetype
Our controller action looks like this:
def create(conn, %{"filename" => filename, "mimetype" => mimetype}) do
  conn
  |> put_status(:created)
  |> render("create.json", signature: sign(filename, mimetype))
end
In our upload_signature_view.ex file, we need to create our create.json render. This is just a simple return.
def render("create.json", %{signature: signature}) do
  signature
end
Signing filename and mimetype for secure uploads.
At this point we’re ready to dive into the meat of the signature generation: the sign function that’s being invoked in the controller.
These functions can be placed in our UploadSignatureController file.
defp sign(filename, mimetype) do
  policy = policy(filename, mimetype)

  %{
    key: filename,
    'Content-Type': mimetype,
    acl: "public-read",
    success_action_status: "201",
    action: "https://s3.amazonaws.com/#{System.get_env("S3_BUCKET_NAME")}",
    'AWSAccessKeyId': System.get_env("AWS_ACCESS_KEY_ID"),
    policy: policy,
    signature: hmac_sha1(System.get_env("AWS_SECRET_ACCESS_KEY"), policy)
  }
end

defp now_plus(minutes) do
  import Timex
  now
  |> shift(minutes: minutes)
  |> format!("{ISO:Extended:Z}")
end

defp hmac_sha1(secret, msg) do
  :crypto.hmac(:sha, secret, msg)
  |> Base.encode64
end

defp policy(key, mimetype, expiration_window \\ 60) do
  %{
    # This policy is valid for an hour by default.
    expiration: now_plus(expiration_window),
    conditions: [
      # You can only upload to the bucket we specify.
      %{bucket: System.get_env("S3_BUCKET_NAME")},
      # The uploaded file must be publicly readable.
      %{acl: "public-read"},
      # You have to upload the mime type you said you would upload.
      ["starts-with", "$Content-Type", mimetype],
      # You have to upload the file name you said you would upload.
      ["starts-with", "$key", key],
      # When things work out ok, AWS should send a 201 response.
      %{success_action_status: "201"}
    ]
  }
  # Let's make this into JSON.
  |> Poison.encode!
  # We also need to base64 encode it.
  |> Base.encode64
end
Looks crazy, but take a minute to digest what’s happening at each line, there’s some helpful comments.
Now you can use the returned token to upload your file to your S3 bucket. You can use something like Dropzone, jQuery Uploader, or whatever you need.
Many thanks to ElixirSips for this terrific article, I used it as inspiration to simplify it a little bit and apply it to my project.
[ElixirSips 274] Direct Uploads with S3 in a Phoenix API
Enjoy fast uploads and an even faster Phoenix API!
Phoenix Framework — Direct Uploading to Amazon S3. was originally published in sergiotapia on Medium, where people are continuing the conversation by highlighting and responding to this story.
↧
Validate valid URL in Elixir.
Here’s a quick snippet for you guys. Sometimes you need to know if a URL is valid or not.
A simple way to do this is by using the URI.parse/1 function.
defmodule MyApp.Helpers.UrlValidator do
  def valid_url(url) do
    case URI.parse(url) do
      %URI{scheme: nil} -> {:error, "No scheme"}
      %URI{host: nil} -> {:error, "No host"}
      _ -> {:ok, url}
    end
  end
end
To call it just do this:
MyApp.Helpers.UrlValidator.valid_url("https://google.com")It’ll return either {:ok, "https://google.com"} or {:error, error_string} .
Hope this helps!
Validate valid URL in Elixir. was originally published in sergiotapia on Medium, where people are continuing the conversation by highlighting and responding to this story.
↧
How to block Chinese IP addresses in Phoenix Framework.
Everyone has been in this situation at least once.
You’re relaxing, enjoying a nice afternoon working on a feature and suddenly you start seeing a bunch of traffic China doing all sorts of interesting things in your application.
Mitigation steps should be done at the web server level first and foremost. But sometimes that isn’t available to you — say if you’re hosted on Heroku.
If you do have access to your web server, you can use this handy list to configure your block list at the web server level. http://www.parkansky.com/china.htm
I’m going to show you how to block access at the code level, in your application.
What we’re going to use
- plug_attack — this allows us to write a Plug that will allow specific connections.
- ip2country — this will allow us to transform an IP octet into a country code. Nifty!
- remote_ip — this automatically overwrites the conn.remote_ip with the value in the X-Forwarded-For header that places like Heroku uses. We need to know if someone came from China or not.
Add these packages to your mix.exs file and run mix deps.get.
{:plug_attack, "~> 0.3.0"},
{:ip2country, "~> 1.1"},
{:remote_ip, "~> 0.1.4"}
Create your Plug.
defmodule MyApp.Plug.PlugAttack do
  import Plug.Conn
  use PlugAttack

  rule "deny china", conn do
    ip_address = conn.remote_ip |> Tuple.to_list |> Enum.join(".")
    allow IP2Country.whereis(ip_address) not in [:CN]
  end
end
Add your Plug to your endpoint.ex file.
You want to ideally nuke the bad actor’s connection as fast as possible to make way for real customers.
Adding it to the endpoint.ex file before anything else, will mean that the conn is halted before any other step is taken. Perfect!
plug MyApp.Plug.PlugAttack
At this point you will be blocking Chinese IP addresses.
There’s one more step you need to take, making sure you get the remote_ip correctly.
Let’s just call the remote_ip plug right before our PlugAttack module.
plug RemoteIp
plug MyApp.Plug.PlugAttack
That’s all you need to do to block Chinese IP addresses in Phoenix Framework.
How to block Chinese IP addresses in Phoenix Framework. was originally published in sergiotapia on Medium, where people are continuing the conversation by highlighting and responding to this story.
↧
How to show all Ecto query data in iex.
Here’s a quick tip for those times when you’re querying Ecto data in iex.
You’re running a query in your terminal using iex -S mix, and the data you’re getting back is truncated at the end.
%MyApp.Accounts.User{__meta__: #Ecto.Schema.Metadata<:loaded, "users">,
  confirmation_code: nil, desktop_notification_preference: "everything",
  disabled: false, email: "example@email.com", ...},
 %MyApp.Accounts.User{__meta__: #Ecto.Schema.Metadata<:loaded, "users">,
  confirmation_code: nil, desktop_notification_preference: "everything",
  disabled: false, ...},
 %MyApp.Accounts.User{__meta__: #Ecto.Schema.Metadata<:loaded, "users">,
  confirmation_code: nil, desktop_notification_preference: "everything", ...},
 %MyApp.Accounts.User{__meta__: #Ecto.Schema.Metadata<:loaded, "users">,
  confirmation_code: nil, ...},
 %MyApp.Accounts.User{__meta__: #Ecto.Schema.Metadata<:loaded, "users">, ...},
 %MyApp.Accounts.User{...}, ...]
Here’s how you can get all the query data rendered in your terminal — no longer truncated!
MyApp.User |> MyApp.Repo.all |> IO.inspect(limit: :infinity)
The will cause all the data to be rendered completely in the terminal.
Enjoy!
How to show all Ecto query data in iex. was originally published in sergiotapia on Medium, where people are continuing the conversation by highlighting and responding to this story.
↧
↧
Killing all socket connections for a user in Phoenix Framework
Sometimes you want to cut off all socket connections for a user in your application.
A specific scenario: You deactivate a user, and while you protect your APIs from deactivated users, that socket is still open and they can still receive live events being broadcasted.
If they refresh the page you’re fine, because that socket is protected against deactivated users.
But while that authenticated window is open, they can still get data.
Here’s how you can effectively kill all open socket connections for a user.
alias MyApp.Web.Endpoint
def deactivate(conn, %{"id" => user_id}) do
  with {:ok, _user} <- MyApp.deactivate(user_id) do
    Endpoint.broadcast("user_socket:#{user_id}", "disconnect", %{})
    json(conn, %{message: "User has been deactivated."})
  else
    _ -> not_found_error(conn)
  end
end
Just broadcast that event from your controller and you’re all set.
Of course you should add some authentication and authorization to this. Can this user deactivate people? Can he only deactivate people within his organization? Can he deactivate himself (woah!)?
I hope this puts you on the right path, enjoy!
Killing all socket connections for a user in Phoenix Framework was originally published in sergiotapia on Medium, where people are continuing the conversation by highlighting and responding to this story.
↧
Generate images with name initials using Elixir and ImageMagick.
When a new user signs up to your website, you may want to generate an initial profile picture for them using their initials.
Here’s a nice way to do it using Elixir, ImageMagick, and a custom font.

First make sure you have ImageMagick installed. On Mac, it’s pretty easy to just use Homebrew.
brew install imagemagick
Here’s where the magick (kek) happens.
@doc """
Generates an image using first name and last name of a user using imagemagick's convert command line tool.
"""
@spec create_from_initials(binary, binary) :: {:ok, binary}
def create_from_initials(first_name, last_name) when byte_size(first_name) > 0 and byte_size(last_name) > 0 do
  size = 512
  resolution = 72
  sampling_factor = 3
  background_color = "#003366"
  text_color = "#FFFFFF"
  initials = "#{String.at(first_name, 0)}#{String.at(last_name, 0)}"
  image_path = System.tmp_dir!() |> Path.join("#{initials}.png")
  System.cmd("convert", [
    # sample up
    "-density",
    "#{resolution * sampling_factor}",
    # corrected size
    "-size",
    "#{size * sampling_factor}x#{size * sampling_factor}",
    # background color
    "canvas:#{background_color}",
    # text color
    "-fill",
    text_color,
    # font location
    "-font",
    Application.app_dir(:my_app, "priv/fonts/SourceSansPro-Regular.otf"),
    # font size
    "-pointsize",
    "300",
    # center text
    "-gravity",
    "center",
    # render text in the center
    "-annotate",
    "+0+0",
    "#{initials}",
    # sample down to reduce aliasing
    "-resample",
    "#{resolution}",
    image_path
  ])

  {:ok, image_path}
end
Lots of ImageMagick flags, but they’re all commented for you to understand what each does.
Notice how I placed the custom font file in the priv folder and created a folder called fonts.
Thanks to Patrick for his answer on StackOverflow, I took his initial code and added some tweaks to it to make it easier to configure.
Hope this helps you out! Leave a 👏if this saved you some time!
Generate images with name initials using Elixir and ImageMagick. was originally published in sergiotapia on Medium, where people are continuing the conversation by highlighting and responding to this story.
↧
How to use FontAwesome in your React Native applications (iOS and Android)
Usage is pretty simple these days thanks for huge efforts made by the very talented engineers working on React Native.
Here are the direct steps for using FontAwesome in your react native apps.
Install react-native-fontawesome
entria/react-native-fontawesome
yarn add react-native-fontawesome
This gives you nice components that reference the fontawesome font. You just call the icon that you want using your JSX.
import FontAwesome, { Icons } from "react-native-fontawesome";<FontAwesome>{Icons.chevronLeft}</FontAwesome>Pretty tidy.
We still need to actually install the font file though. That’s the next step.
Install the FontAwesome font file in your react native project.
Download the 4.7.0 version of FontAwesome, and when you open the folder you will see a .ttf font, this is the font we need to copy over to our project.
Rename this file to FontAwesome.ttf
Now go to your React Native project and create a folder at the root called assets/fonts/ and drop the file there. Here’s what your folder structure should look like:
Use react-native link to let your mobile apps use the font file properly.
Open up package.json and add a new entry at the root level called rnpm. Add this:
...
},
"rnpm": {
  "assets": [
    "./assets/fonts"
  ]
},
"jest": {
  ...
Make sure it’s at the root level of the configuration object.
At this stage, I would highly recommend a git commit. Things can go wrong and hunting down exactly what happened is a HUGE pain without the git to revert. COMMIT NOW.
Did you commit? Good.
Now run the react-native link command in your terminal.
You can use git status to learn what this command did to your ios and android projects, it’s really nifty!
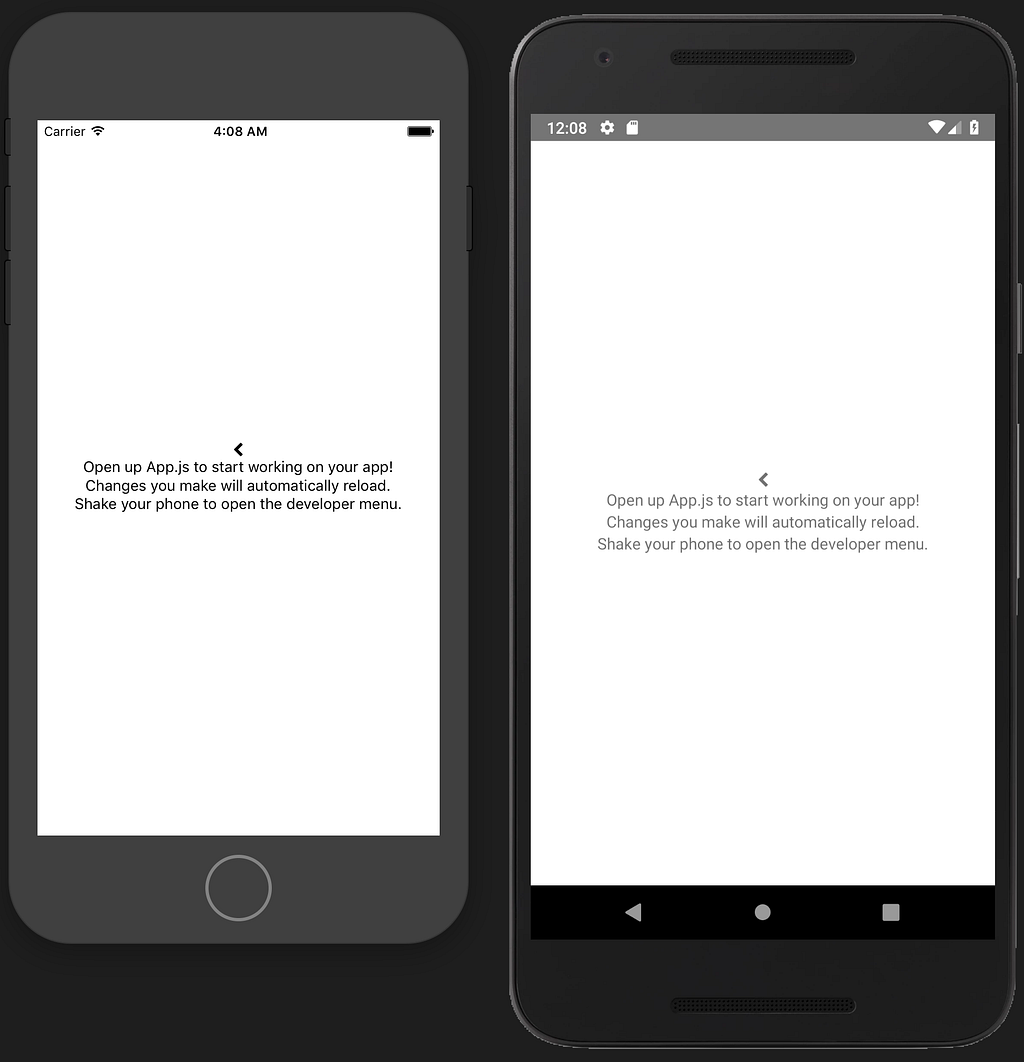
Restart your simulators and bundlers and you’re done!
You should now see the chevron in both apps.
How to use FontAwesome in your React Native applications (iOS and Android) was originally published in sergiotapia on Medium, where people are continuing the conversation by highlighting and responding to this story.
↧
H1 Tag as your Logo? Web Design and SEO
I had an interesting chat whilst working on a web design project alongside Mike Jolley the other day, as we was working on Theme Slice a PSD to WordPress Theme conversion service – sorry had to get that in, our different styles of coding ignited an interesting topic; Should the H1 tag be used for a logo?
We both class ourselves as semantic web coding types, but should the H1 tag be used as your logo? – on this conundrum we disagree.
Mike along with most web designers work I view use the H1 tag as the logo, I do not, I often use an anchor with an image within it, and heres why:
Anthony’s Argument
Usually the first heading tag that your web browser and users encounters is the H1 tag and theres one on every page, the H1 tag semantically has the most grunt and is the premier tag you should use for the main heading for that web page.
Notice I said “Web Page”, as this is where the problem with using a H1 tag and putting your logo within it lies. Every page on your website has different content and I believe the H1 tag should support this.
For instance lets say you run a design agency called Dave’s Design and you have a web design services page. To identify to users and to the web browsers a fair reflection of what the content is on that page it makes sense that the main heading (H1) should say “web design services”.
But if the H1 tag was used as a logo, as is often the case, then the web design services pages H1 tag would be Daves Design, actually in this scenario the H1 tag on every page of the Dave’s Design website would be H1, which does not reflect all the different content on each individual web page across the website.
Therefore it is my belief that we should simply use a anchor tag with the logo within that anchor and leave the H1 tag to do its semantic duty as the foremost representative of the web pages content.
Logo’s are always a vector or bitmap image and so I believe semantically should be represented that way, to say that an image is a heading to me just seems plain stupid.
Who won?
In case you was interested to know Mike won the argument in this instance, as Theme Slice is aimed at web designers we have coded in the most popular coding methods, everyone seems to use the H1 tag as a logo, so we followed like sheep, please share your view?
The post H1 Tag as your Logo? Web Design and SEO appeared first on Design Bit.
↧
↧
Design With Web Conventions
Web conventions can be used to improve the user experience of your web pages. The learned behavior of users surfing many websites web-wide has created some web design conventions that we can take advantage of in our page designs, easing the viewers journey with a sense of familiarity.
Hyperlinks
One of the first things we learn about the Internet is what those blue underlined links do, they don’t have to be blue, but I do believe you must differentiate them by giving them an underline or a background color. Changing the color only isn’t a great solution as users with color blindness cannot tell the difference. Visited links should usually change color, most commonly a nice purple, recently I have seen more sites using a strike through which seems to work well.
Heading Structure
Users are used to reading in a certain way, magazines and newspapers and now the web, lets take advantage of the nested information structure users are used too. Headings will ease users perception of the information structure allowing them to get a good overview of the information.
The heading could be larger, a different color or have extra space around it to signify its importance. After the main heading the sub headings should also follow a similar semantic order.
Headings should highlight in one or a few words what the following paragraph is about, on the web this ultimately creates scan-ability, something your users will appreciate.
Logo
The logo / site ID, should link to homepage of the website – though probably best to have a home link in the nav as well, the user will feel reassured as she knows there is always a way to start all over again. The logo is usually positioned top left side of the web page.
Buttons
Buttons are going to do something, actionable events, keep buttons for actions. A great element of their design is that they are three dimensional, so its obvious they are click able. I often don’t over style buttons on my designs, leaving the users web browser to style the buttons, this may offer the viewer a little extra familiarity.
Search
I’d recomend keeping your search forms simple, none of these extra tags for accessibility showing like the label, fieldset etc, and no confusing words like “enter keyword” or “quick search”, from a usability perspective the user wants to see the word “search”. If theres any further search criteria they should be straight forward and addiitional.
Main Navigation
The main navigation usually sits next tothe logo at the top of the web page and usually maps out the main sections of your website, or I like to say “the main features”. These links should all be internal too.
Secondary Navigation
Secondary navigation is often situated in the top left or right sidebar and more recently found directly underneath the main navigation showing sub page structure, this is usually a list of hyperlinks leading to category or even content pages.
Utilities Navigation
This navigation is usually at the top right of a web page and includes helpful links such as a Sitemap, Search, a link to the Home Page and Contact page, on a ecommerse site this would probably house the Shopping Cart and Checkout links too.
Images
If a photo has some text underneath it this usually means its a caption describing the image, or the photographers name. If you click on the image thumbnail it will show you a larger version of the image.
Skip to Top
A link at the bottom of the page to take the user back to the top of the page, I’d reccomned this link be aligned with the pages content and that its clearly displayed, I dislike websites that put this on right, I’d suggest this should be the first link in the footer.
Grouped Items
Similar items can be grouped into a list of hyperlinks to show they have a relationship, maybe they are in the same category of service or related products in an ecommerce website. Grouping similar items makes their associations clearer to the user.
Shopping Cart
Don’t call it basket, or carry bag, I’m English and I say “shopping bag” and not “shopping cart” but its the metaphor and wording that’s used the most across the web, so pick a side and stick with it. The shopping cart icon is also widely recognizable across the web, so you may not need the word “shopping Cart”.
Conclusion
Web conventions shouldn’t get in the way of progress and as a designer you must preserve your artistic license, be creative and progressive, and remember conventions had to start somewhere, its more of a web trend than an ideal of design, but if you want to create the best user experience then designing with conventions in mind will aid your users greatly.
There’s probably a good few web conventions I have missed, feel feel to comment and I’ll add them.
The post Design With Web Conventions appeared first on Design Bit.
↧